
Easy spring nail art | Diseño de uñas super faciles.


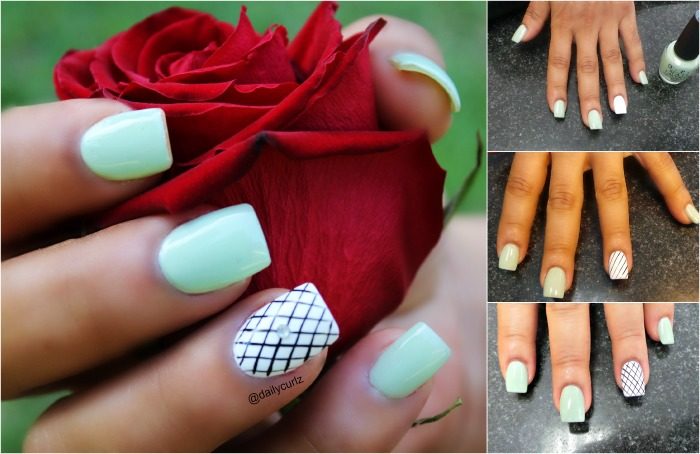
 Spring is here, YES, but if you live in Southern California, you know that the past days it has felt like Summer with almost three digit weather; and no, I am not complaining because I love summer. Last week I decided to try a new nail design, mainly because I will be in Miami for the whole week and I want my nails to look on point. So I got an inspiration for the hot weather with this beautiful and easy spring/ summer nail art design using the colors mint, white, and black.
Steps:
- On clean and filed nails** Paint your nails with a mint green nail polish ( I prefer OPI’s nail lacquer in Gargantuan Green Grape) making sure to leave the ring finger unpainted.
- While you let the mint green nail polish dry, paint your ring finger with a white nail polish.
- Once your nails are completely dry, you can now start with the design on your ring finger. With a fine tip black nail polish, you will draw slanted lines going from left to right. Once again, you let that dry completely before continuing with the next step.
- After this, you will draw slanted lines again but this time going from right to left. And you already know but, let your nails dry completely!!!
- With this next step, you will need a rhinestone of any size and with that, you will place the rhinestone right in the middle of the your nail.
- Now you’re ready to apply top coat to make your nails last longer. Voila!.
Español
La primavera está aquí, sí, pero si vives en el sur de California, sabes que los últimos días se ha sentido como verano con temperatura de casi los tres dígitos; y no, no me quejo porque me encanta el verano. La semana pasada me decidí a probar un nuevo diseño de uñas, sobre todo porque voy a estar en Miami durante toda la semana y quiero que mis uñas están bellas. Así que me dio inspiración las altas temperaturas para este diseño de primavera / verano de uñas que es hermoso y fácil usando los colores menta, blanco y negro.
Pasos:
** En las uñas limpias y limadas ** Pinta tus uñas con un esmalte de uñas verde menta (prefiero laca de uñas de OPI en Gargantuan Green Grape) asegurándote de dejar el dedo anular sin pintar. Mientras dejas que el verde menta se seque, pinta tu uña del dedo anular con un esmalte de uñas blanco. Una vez que tus uñas estén completamente secas, puedes empezar con el diseño del dedo anular. Con un esmalte de punta fina negro, traza líneas inclinadas que van de izquierda a derecha. Una vez más, tienes que dejar secar por competo antes el siguiente paso. Después de esto, tendrás que trazar líneas inclinadas de nuevo, pero esta vez va de derecha a izquierda. Y ya sabes: deja que tus uñas se sequen por completo !!!
Yo termine el diseño con una gema pequeña en el centro de la uña del dedo anular y luego termine aplicando una capa de esmalte claro para sellar el diseño. Y listo, uñas perfectamente pintadas que son una combinación de elegantes, con estilo, y absolutamente fáciles de hacer.
2 Comments